Thai Shrimp Bisque

Processed with VSCO with f2 preset

Thai Shrimp Bisque

If you’ve got an immersion blender, how lucky are you! Gazpacho, bisque, and tomato soup galore. If you don’t, it’s worth getting one TODAY! You can blend straight into the pot and it saves you from washing more pots and kitchen equipment. I’d pick my immersion blender over my food processor any day if I can. Don’t miss out on this delish Thai Shrimp Bisque recipe.

Recipe yields 2 portions

  • 1 heaping cup peeled and deveined shrimp
  • 1 cup full fat coconut milk (canned)
  • 3 cups seafood broth
  • 2 tablespoons red curry paste
  • 1/2 cup cubed sweet potatoes
  • 1/2 cup diced onion
  • 1 tablespoon vegetable oil
  • Chopped cilantro for garnish.
  1. Heat oil in a medium pot and saute onions and red curry paste together. Add in coconut milk, broth, sweet potatoes and bring to a simmer for 30 minutes or until sweet potatoes are tender. Add in shrimp and cook for 3 more minutes.
  2. Remove from heat and blend with an immersion blender until smooth. Garnish with chopped cilantro. Enjoy!


Dairy-free, Gluten-free Snickerdoodles

13339527_10209436983392524_9039730735184799754_n
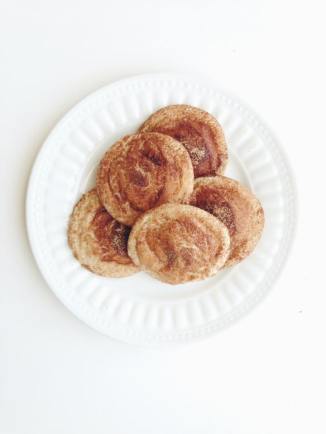
A few months ago, my husband and I transformed our home into a casita, or mini-retreat. We’ve met travelers from all over the world, each of them with unique preferences for food. But here’s one thing our travelers have in common: home-made COOKIES!

When our guests arrive, a plate of fresh cookies is waiting for them. Usually chocolate chunk cookies until recently when I had one guest who turned out to be gluten and dairy intolerant. Luckily, I had a go-to snickerdoodle recipe in my arsenal and swapped the butter for vegetable shortening and wheat flour for Bob’s Red Mill Gluten-free 1-to-1 baking flour. There was hardly any difference and the guests just LOVED IT!

Recipe yields 32 cookies

  • 1 cup vegetable shortening
  • 1 1/2 cup white sugar
  • 2 eggs
  • 2 tsp vanilla extract
  • 2 2/3 cups AP gluten-free flour
  • 2 tsp cream of tartar
  • 1 tsp baking soda
  • 1/4 tsp salt

Cinnamon Sugar

  • 1 tbsp white sugar
  • 2 tsp ground cinnamon

Preheat oven to 350 degrees

Beat shortening with 1 1/2 cups of white sugar until blended. Beat in eggs one at a time, then vanilla. Blend in flour, cream of tartar, baking soda, and salt. Using a small cookie scoop to form cookie dough balls and set aside.

In a separate bowl, mix sugar with cinnamon. Roll cookie dough in mixture until covered completely and place on a nonstick baking sheet 2 inches apart. Bake 8-10 minutes. Cool cookies completely before serving.

*Leftover cookie dough can be stored for up to 6 months if stored in an airtight container in the freezer. When you’re ready to bake, allow the dough to reach room temperature for 15 minutes before baking in the oven.

Easy Vegetarian Chili

Processed with VSCO with f2 preset

Meatless Monday Vegetarian Chili

Why I didn’t think about adding chili to our Meatless Monday routine before.. Well, I’m not sure! It’s a great way to add flavor to your favorite veggies and it makes for such a delicious, comforting bowl of chili. Check this recipe out!

Yields 4-6 servings

  • 4 cups of chopped cauliflower
  • 1 cup diced bell pepper
  • 1 cup diced onion
  • 2 cups of chopped mushrooms
  • 1 can of diced roasted tomatoes
  • 4 teaspoons minced garlic
  • 2 heaping tablespoons tomato paste
  • 16 oz can of your favorite beans, rinsed and drained
  • 1 tablespoon ground cumin
  • 1 tablespoon chili powder
  • 1 tablespoon smoked paprika
  • 4 cups of vegetable stock
  • olive oil
  • 2 teaspoons of salt
  • cheese and sour cream (optional)

With a large stew pot, add a couple tablespoons of olive oil on medium high heat and cook onions and garlic until softened. Add in remaining vegetables and cook for 5 minutes. Add in salt and remaining spices. Stir well then add in beans and stock. Bring to a low simmer and cook uncovered for 30 minutes until some of the liquid reduces and the chili begins to thicken.

Divide chili into bowls and garnish with a dollop of sour cream and cheese. Happy Eating!

Roasted Chicken 101

Processed with VSCO with f2 preset

Tarragon Roasted Chicken

You’ve probably made roasted chicken a million times and a million ways and each time it came out different. No matter how you and I season our birds, we’re all aiming for the same goals: juicy, moist, and tender where it ALMOST falls apart when sliced. I have some simple tips that could be a real game changer for your next roasted chicken. This method is FOOL-PROOF! Guaranteed!

  • 1, 3-4 pound chicken with giblets removed
  • 2 tablespoons of softened unsalted butter
  • 2 teaspoons kosher salt
  • 2 tablespoons chopped tarragon
  • 1 tablespoons minced garlic
  • 1/2 an onion quartered
  • 1/2 a lemon
  • 1/2 cup of water
  • 1 bunch of peeled and chopped carrots
  • 1 onion, chopped
  • 1 large bunch of fresh red radishes
  • parsley for garnish
  • good EVOO (Extra virgin olive oil)
  • Butcher’s twine

Preheat oven to 450˚F. Pat your chicken dry with a paper towel. Doing this ensures that your skin browns evenly and the fat renders without steaming the chicken (We want thin crispy browned skin.)

In a small bowl, make a paste out of the butter, salt, tarragon, and garlic. Using your fingers slowly open the pockets between the skin and the meat of the chicken. Do this gently and take some butter and smear it under the skin and on top of the skin.  Stuff the chicken with the quartered onion and half a lemon. Tie the legs together with twine and tuck wings of the chicken behind its back side.

Pour 1/2 cup of water into roasting pan. Place the chicken on a roasting rack then set on the roasting pan. If you do not have a rack, you can place 4 ramekins upside down and then place the chicken on top. Rub chicken with some good olive oil.

Place chicken on bottom middle rack in oven and bake for 30 minutes. The skin should begin to brown nicely. Loosely cover the roasting pan with foil and lower the temperature to 350˚F and cook for another 30 minutes. Lower temperature once more to 325˚F and cook for another 30 minutes. Add in your root vegetables around the chicken. Drizzle lightly with olive oil and sprinkle with salt. Cook for 1 more hour. Once done, let the chicken rest for 5-10 minutes so the juices redistribute.

Serve your chicken by placing vegetables on a large dish and set chicken on top. Garnish with fresh chopped parsley.

Variations:

  • If you do not have tarragon, you can use a medley of fresh thyme and rosemary, or even sage.
  • You can also substitute chicken broth for water.
  • Skip the butter and use only olive oil if you wish but I think butter really gives the chicken an OOMPH factor that olive oil lacks.

I hope this recipe becomes an addition to your go-to recipes. Happy Eating!

Easy Kofta Kebabs

12801578_589107014571147_1937704779050641087_n

Kofta Kebab is my FAVORITE mediterranean dish. My goodness is there anything better than perfectly seasoned ground beef or lamb with fresh herbs fired on an open grill? I like this recipe because the seasoning can be applied to ground turkey, beef, or lamb. I used beef and and served the meal with sliced tomatoes and yogurt sauce.

Recipe yields 4 servings

  • 1.5 pounds of lean ground beef, lamb, or turkey
  • 1/4 cup finely diced onion
  • 1/4 cup chopped parsley
  • 4 tablespoons of kofta seasoning
  •  olive oil
  • 8 skewers soaked in water

In a large bowl, combine meat, onion, parsley, and kofta seasoning but do not overmix. Using a large spoon, take a scoop of 2 oz of meat and mold into a ball and add to skewer. Add 2-3 meatballs per skewer and repeat with remaining meat. Lightly drizzle with good olive oil. Grill 5 minutes on each side.


Cauliflower with Roasted Pepper Ragout

We have replaced most of our starches with low starch vegetables or leafy greens. Can we just talk about the amazing uses of cauliflower for a bit? It’s such a versatile vegetable. Great for steaming, roasting, grilling, chopping up and using as a rice or pasta substitute (WHAT?! I know). It’s also very low carb and neutral enough in taste to be used across multicultural dishes. I promise you will love this dish cauliflower dish layered with red pepper cream sauce and lots of cheesy goodness! You may want to make extras because people will ask for seconds.

Recipe yields 4 entree servings or 6-8 side dishes

  • 8 cups of fresh cauliflower florets
  • 2 cups of shredded mozzarella cheese
  • 1 cup of roasted red peppers in oil, drained and pureed
  • 1 cup of crushed tomatoes from a can
  • 2 cloves of garlic, minced
  • 1 cup of diced onion
  • 1/2 cup of heavy cream
  • 2 tablespoons of butter
  • salt and pepper to taste
  • 1/4 cup of grated parmesan cheese

Preheat oven to 400˚F.

In a large saute pan, melt the butter on medium high heat then cook the onions and garlic until softened. Add in roasted red peppers, crushed tomatoes, salt and pepper, cream and parmesan cheese. Lower heat to a simmer for 10 minutes until ingredients are combined. Stir occasionally.

Butter a casserole dish and layer half of the cauliflower florets and spoon half the sauce on top. Sprinkle with half of the mozzarella cheese then repeat. Bake for 15-20 minutes or until cauliflower is fork tender but not overcooked. Garnish with fresh parsley if desired.

Around The World in 4 BBQ Rubs

Screen Shot 2016-03-22 at 3.16.55 PM

Sure you can purchase premixed bbq seasoning but where’s the fun in that? If you need a reason to make your own rubs and seasonings, start with the list of ingredients in premixed spices in your grocery store. Chances are they’re laden with sugar, anti-caking agents (silicon dioxide.. YUM!), and MSG (monosodium-glutamate). I don’t want these things hanging around in my pantry and I don’t want to serve it to my family either. I’ve put together 4 seasonings that are essential for any grill master’s pantry. Each bbq rub recipe serves 10.

Asian Rub: Rub liberally on whole chickens or pieces, pork ribs or chops, duck.

  • 1 tablespoon garlic powder
  • 1 tablespoon onion powder
  • 2 teaspoon five spice powder
  • 1 teaspoon salt
  • 1/2 teaspoon black pepper
  • 1/2 teaspoon granulated stevia

Jamaican Jerk: Sprinkle over whole chicken or pieces and different cuts of pork

  • 1 tablespoon onion powder
  • 1 tablespoon garlic powder
  • 1 teaspoon salt
  • 1 teaspoon paprika
  • 1 teaspoon ground allspice
  • 2 teaspoons cayenne pepper
  • 2 teaspoons dried thyme
  • 2 teaspoons dried parsley
  • 2 teaspoons granulated stevia
  • 1/4 teaspoon black pepper
  • 1/2 teaspoon ground cinnamon
  • 1/2 teaspoon ground nutmeg

Lebanese Kofta: Use over ground lamb and beef or chicken breasts

  • 1 tablespoon garlic powder
  • 1 tablespoon onion powder
  • 1 tablespoon ground coriander
  • 1/4 teaspoon black pepper
  • 1/4 teaspoon cayenne pepper
  • 1/2 teaspoon ground allspice
  • 1 teaspoon ground cumin
  • 1/2 tablespoon ground cinnamon

Sweet N Smoky BBQ: Rub generously on beef ribs, brisket, chicken, turkey, or pork.

  • 1 tablespoon onion powder
  • 1 tablespoon garlic powder
  • 1 tablespoon smoked paprika
  • 1 teaspoon granulated stevia
  • 1 tablespoon ground cumin
  • 1 tablespoon chili powder
  • 1 1/2 tablespoons salt
  • 1 teaspoon black pepper


Vegetarian Broccoli Salad + tips on going meatless

Processed with VSCOcam with f2 preset

Vegetarian Broccoli Salad

It’s been over 3 months since our family has participated in Meatless Monday. We started giving up meat 1x a week so that we can focus on more important things than food like making room for spiritual time, getting chores done, writing a cookbook (yay!) and practicing to live with as little as possible not because we can’t have an abundance but because we actually don’t need as much as we think we do. I realize too that giving up something like meat makes us more thankful for what we have. It also helps us appreciate the people who raise and slaughter our animals, something we don’t have to do because meats are packed nicely in the supermarkets so that we forget that we’re eating something that came from a farm. In so many ways, we’ve lost touch with the concept of sacrificing. We hope to understand and appreciate what’s been done for us by giving something luxurious up even just for a day.

I have some advice if you are thinking about going short-term vegetarian:

  • Do not be afraid of aromatics like garlic, onions, shallots, and leek. Use them in your marinade, dressings, and garnishing for a punch of flavor.
  • Have fresh and dried herbs on hand. I prefer dried herbs for dipping sauces and dressings since they hold up better. I love fresh for garnishing, braising, roasting and grilling.
  • Stock your pantry with an array of spices that you love. My new obsession is smoked paprika which I use on baba ghanoush, hummus, and grilled meats for a sweet and smoky punch. Fun recipe to try it below.
  • Venture out and try new produce to add variety in your vegetarian diet.
  • If you crave a meat dish on your meatless days, find a vegetarian substitute.

Here’s a delicious recipe you can try. Completely meat free and satisfying. I love the tanginess of the apple cider vinegar and the creaminess of the mayo.

Recipe yields 2 entree servings or 4 sides

  • 4 heaping cups of fresh broccoli florets
  • salt for water
  • 1/2 teaspoon of stevia
  • 1/3 cup chopped onion
  • 1 tablespoon apple cider vinegar
  • 1 cup mayonnaise
  • 1/4 teaspoon salt
  • 1/4 teaspoon chopped garlic
  • 1/4 cup chopped walnuts

Bring a pot of water to a boil and add some salt. Blanch the broccoli for 2 minutes and drain. Allow to cool completely.

In a bowl mix together vinegar, mayonnaise, salt, garlic, stevia. Add in onions and chopped walnuts. Pour dressing over broccoli and mix to coat evenly. Chill before serving.


Simple Yellow Curry

Hi all! Yellow curry is one of my favorite go-tos when I want something warm and savory. I always have Madras yellow curry on hand in my pantry just in case the craving strikes. Traditionally, the Vietnamese version is made with sweet potato, a whole chicken cut into pieces, onions, and lots of lemon grass. My version will be much simpler, carb-friendly, and I bet most of these items you already have in your pantry if you cook Asian food even occasionally. Let’s start!

Processed with VSCOcam with f2 preset

Delicious Yellow Curry Noodles w/ Shirataki 

Recipe yields 4 servings

  • 1 cup of diced onion
  • 1/4 cup of Madras yellow curry powder
  • 1 can of unsweetened coconut milk
  • 2 teaspoons salt
  • 1 tablespoon of sliced ginger
  • 1 can of chicken broth
  • 2 cups of water
  • 2 tablespoons of avocado oil (coconut oil works too)
  • 2 cloves of garlic, minced
  • 4 small chicken thighs sliced 1/3 inch thick

Optional low-carb additions to the stew:

  • sliced mushrooms
  • eggplant cubes
  • baby spinach
  • baby corn
  • bell pepper strips
  • broccoli florets
  1. In a medium pot on medium high heat, add oil and fry the onions.
  2. Once fragrant, add in garlic, ginger, curry powder, and chicken thighs. Stir well and add in remaining ingredients. Bring to a boil and simmer on low for 20 minutes before serving.
  3. You can serve this soup as is or over heated shirataki (0 carb) noodles. Enjoy!

sushi

Something amazing was discovered this past week: Cauliflower rice works as a substitute for rice. Oh my goodness! I am in low-carb heaven! I have been craving for sushi and this was perfect. I realize that because of the lack of starch in the rice itself, cauliflower would work only in maki rolls but not nigiri. If you’re interested in learning how to make this, follow the steps below:

Recipe yields 4 servings

Cauliflower Rice and Nori:

  • 1 medium head of cauliflower cut into florets, stems and leaves removed
  • 2 tablespoons of rice vinegar
  • 1/4 teaspoon of salt
  • 6 sheets of roasted nori (seaweed)

Filling options:

  • 1 avocado, skin removed, pitted and sliced into 1/4 inch thick
  • 1 8 oz block of cream cheese cut into strips
  • cooked shrimp, or your choice of fish, or even better, sashimi
  • 1 english cucumber, skin removed and sliced in thin strips

Serve with:

  • soy sauce
  • ginger
  • fresh wasabi
  • spicy Sriracha mayo
  1. In a food processor, chop cauliflower florets until texture resembles rice kernels.
  2. Saute rice on a large pan until heated through. Add in rice vinegar and salt and cool completely.
  3. Using a sushi bamboo mat, center the nori sheet. Add 1/2 cup of cauliflower rice and spread evenly, leaving 1 inch at top and bottom of sheet. Place filling in the center of rice and gradually roll from bottom to the top, applying pressure to seal the nori. Slice into 3/4 inch pieces and serve.

A weight-loss journey with Keto

On January 10th, Dan and I buckled down and decided we would encourage each other to jump back on the ketogenic diet which consists of a moderate amount of protein, mostly fat, and restricted carbohydrates. If you hung around us enough last year, we shared with you our journey when we first started in 2015. Together we lost a total of 25 pounds in 2 months! It was unbelievable since it seemed almost effortless. We hardly dined out and instead cooked our low-carb, high-fat meals at home and discovered that the foods were so enjoyable and filling, we didn’t miss eating sugar and carbs as much. Of course, I missed eating donuts with coffee and ice cream but the longer we stuck to our new lifestyle, our cravings for junk food actually curbed.

Fast forward a couple of months later, between a move and job changes, a heavy amount of stress, and an engagement (yay!) we both started drifting from our fitness goals and are now kicking ourselves in the butt for doing that. It all pointed back to our dependency on food when life gets rough. Eating ice cream for dinner had a way of making troubles melt away and made us feel like crap immediately. In the end, each time we deviated from our goal, we sold out for something cheap and it was never worth it. Needless to say, we gained the weight back and then some. We were both so tired, too worn out from long drives between 2 big cities and no fuel left in the energy bank to do anything fun. The sad thing is, this was our lifestyle and we just accepted it because we were so busy that we put our health in the backseat and pretended it would be ok. It gets worse.

One Sunday we had lunch with my parents and my mom breaks the news that my dad is pre-diabetic and his sugar levels are off the charts. The doctor was concerned that if he doesn’t change his lifestyle and eating habits soon, he’ll definitely be T2 Diabetic. This could’ve happened to anyone in my family. I am probably more prone to additional health problems since I already have hypothyroidism. I decided that there are no excuses. It was up to me if I wanted to live long and feel good. Life’s hard enough. I don’t want to drag my body through it all with shots of espresso every time I feel a little tired or gravitate towards sugar when life gets rough.

So we jumped back onto keto and holy hell I’ve been needing coffee less. Today is my 9th day on keto and I’ve lost 6 pounds. Every day is a fight and it helps to have a support to keep cheering you on. Daniel and I try to encourage each other to do better but most importantly, we hold each other to be accountable. If you’re on the same journey, I say, keep fighting! Just remember, every small step works toward a bigger goal and it will be worth it.

KCKO (Keep Calm and Keto On!)

Cinnabun Whoopie Pies

Guys, we’re only a day away from the weekend! REJOICE!

This morning I was craving for a cinnamon roll and decided to play around with some eggs, almond flour, and cinnamon and was so excited the final product came out so well.

image

I whisked some egg whites with cream of tartar until stiff peaks form and then added in a mixture of the remaining egg yolks, truvia, and cinnamon. I added the mixture to a piping bag and piped what mostly looked like a cinnamon roll. I baked it at 300ºF for 25 minutes and when it cooled completely, I topped it with some cream cheese and truvia frosting and VOILA! DELISH! With only 5g of net carbs, this recipe is tasty and healthy.

Makes 4 cinnabun whoopie pies

Whoopie pies:

  • 3 eggs, separated
  • 1/4 teaspoon of cream of tartar
  • 3/4 cup of almond meal
  • 2 packets of stevia sweetener
  • 1/2 teaspoon of cinnamon

Icing:

  • 4 ounces of cream cheese
  • 1/2 teaspoon of cinnamon
  • 1 packet of stevia sweetener
  1. Set your oven to 300ºF. In a large bowl, whisk egg whites with cream of tartar until soft peaks form. In another bowl, mix the egg yolks, almond flour, cinnamon, and stevia. Combine the wet and dry ingredients and fold the mixture with a spatula until you get an even batter.
  2. Line a baking sheet with parchment. Add batter to piping bag and pipe a cinnamon bun swirl about 3 inches wide. Space each whoopie pie about 1 inch apart. Bake for 25 minutes and allow to cool.
  3. Mix the ingredients for the cream cheese icing and divide evenly between each whoopie pie sandwich. ENJOY!


Paleo bread 3: almond, coconut, flax, tapioca

I just really love this bread! My favorite yet since it is not too coconut-y, does not crumble, super high in fiber yet low in carbs. Holds up well in sandwiches and the texture is slightly chewy. It’s the perfect bread for toasts as well!

paleobread3

  • 1.5 cups of warm water (almost too hot to touch)
  • 2 tsp dry active yeast
  • 2 cups almond meal
  • 1 cup coconut flour
  • 1 cup flax meal
  • 1 cup ground tapioca
  • 4 eggs, beaten
  • 1/2 cup melted coconut oil
  • 2 tbsp apple cider vinegar
  • 1 tsp salt
  • 2 tsp baking powder
  1. In a large bowl, combine yeast and water and mix well. Allow up to 5 minutes to foam or bubble.
  2. Add in oil and eggs then remaining ingredients.
  3. Cover with damp towel and allow to rise for 45 minutes.
  4. Transfer dough to a greased loaf pan and bake for 50-60 minutes. Cool completely before slicing or storing.

Paleo bread 2: almond, flax, psyllium, tapioca

Paleo bread 2 is an adaptation of Paleo bread 1 but does not contain coconut. The flavor of almonds comes through the most in this recipe and is a much more dense but very low carb bread.

paleobread2

  • 1.5 cups of very warm water (almost too hot to touch)
  • 3 eggs, beaten
  • 1 tsp salt
  • 2 tbsp apple cider vinegar
  • 1/2 cup melted coconut oil
  • 5 cups almond flour
  • 1 cups psyllium husk powder
  • 1/2 cup tapioca flour
  • 1/2 cup flax meal
  • 2 1/2 tsp active dry yeast
  1. Preheat oven to 350ºF. In a large bowl combine yeast and water and stir. Allow to rest and foam for 5 minutes.
  2. Add in coconut oil and eggs. Stir in remaining dry ingredients and mix well with hands.
  3. Cover with damp towel and allow to rise for a minimum of 45 minutes.
  4. Transfer dough to a greased loaf pan and bake for 50-60 minutes or until an inserted knife comes out clean from the center.

Paleo bread 1: psyllium, flax, coconut, tapioca

Hi everyone! I’ve been baking and experimenting with different gluten-free yeast based breads as of late and have found some wonderful combinations. I want to share a recent recipe for a healthy, gluten-free sandwich bread. It’s slightly nutty and sweet from the coconut flour and wonderful when toasted and it holds great on hearty sandwiches.

paleobread1

  • 1.5 cups very warm water (almost too hot to the touch)
  • 2 tsp active dry yeast
  • 3 eggs, beaten
  • 1 tsp salt
  • 2 tbsp apple cider vinegar
  • 1/2 cup melted coconut oil
  • 1 cup coconut flour
  • 2 cups psyllium husk
  • 2/3 cup tapioca flour
  1. Preheat oven to 350ºF. In a large bowl, add warm water and yeast and stir together and let sit for 5 minutes. Once the mixture foams slightly, add in eggs and melted oil then the remaining dry ingredients.
  2. Mix ingredients well with your hands and form into a ball. Cover the bowl with a damp towel and allow dough to rise for a minimum of 45 minutes. It also helps if to leave covered in the oven with the light on.
  3. Then, transfer dough into a greased loaf pan and bake for 50-60 minutes or until inserted knife comes out clean. Allow bread to cool completely before slicing.

paleobread1.2